Tuesday, June 25
Friday, June 21
Burlington Beach Strip
Making Burlington beach strip hydro towers disappear a tall order

Ridding Burlington's beach strip of skyline-dominating hydro towers would cost local taxpayers up to $36 million, according to early talks between utility and city officials.
And that estimate doesn't include the price tag of powering down Hamilton's side of the ship canal, either — a cost previously pegged at more than $70 million.
Burlington officials recently met with Hydro One for an "informal analysis" of the cost to move, bury or beautify the wall of 60-metre-tall transmission towers between downtown and the ship canal, said Councillor Rick Craven.
Options range from $8 million to swap out some "oil derrick-type" towers with less obtrusive poles, to $36 million to bury the 230,000-volt transmission lines, said Craven, calling those numbers "ballpark" figures.
"They repeatedly pointed out the city would be paying the costs, if this were ever to go ahead," said Craven, who expects council to request a formal Hydro One report. "Everyone wants to see them removed but the question is how, and how much."
There are 30 lakeshore power towers between downtown Burlington and Van Wagner's Beach, each about the size of the Royal Connaught Hotel.
So far, Burlington has only asked about its side of the ship canal.
"Once you get past the canal, that's Hamilton's responsibility," said Craven with a laugh.
Any plan to reroute the corridor would affect the "visual pollution" on Hamilton's beach strip, too, said Councillor Chad Collins, who wants to be involved in any formal study.
Collins said he asked Hydro One to estimate a relocation cost for the Hamilton side in 2009 and was told "at least $70 million."
Spokesperson Nancy Shaddick said Hydro One won't comment on informal conversations.
But an email to Collins from the utility said burying power lines along the lake would be "difficult if not impossible" due to erosion and environmental concerns.
Another option is to reroute the towers away from the lake and along the harbour side of the beach strip, closer to the treatment plant and port authority lands. But Hydro One told Collins the two cities would have to find a new right-of-way between Burlington and Van Wagner's Road, where the towers veer away from the lake.
If the beachfront towers do come down, area property values would go up "very rapidly," said Hamilton real estate agent Conrad Zurini.
"Conservatively speaking, I'd guess 15 or 20 per cent right off the bat," said Zurini, who cautioned the area is still overshadowed by the skyway and lacks amenities. "Right now, a significant number of people will simply refuse to buy (near a hydro tower)."
As it stands, available Beach Boulevard homes along the power corridor range from a townhome for $280,000 to a three-bedroom "luxury waterfront bungalow" for $880,000.
A hydro tower shuffle could also help the environment, said Collins, because machinery used for maintenance routinely damages sensitive beach ecology.
It might even prevent the odd lawsuit — Burlington settled with a woman who sued in 2007 after a power-line-zapped cormorant fell on her head in Beachway Park.
Craven said a clear skyline at Burlington's beach is likely a couple of decades away. "But part of our job is to cast our eyes 20, 25 years down the road and ask where we're going."
Wednesday, June 19
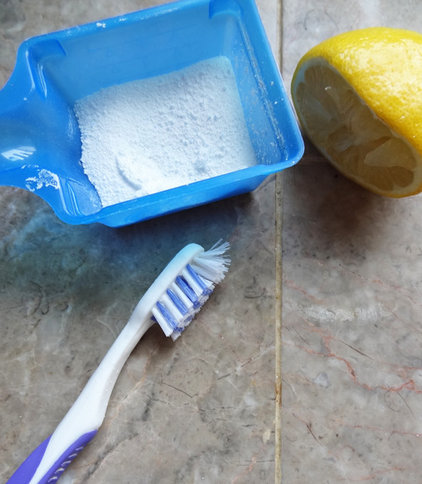
IS GROUT GROSSING YOU OUT???
by Meg Padgett
Tile — whether it's used as flooring, in the kitchen as a backsplash or for counters, or in the bathroom — has one great downfall: grout. Since grout is porous in nature, unsealed grout absorbs all kinds of stains, from mildew to coffee and everything in between. To say it's a headache to keep grout clean is an understatement.
Note: Be wary of using too much lemon juice with marble, since it can etch or damage the stone if left on too long. Hydrogen peroxide can be a safe alternative.
Note: Be wary of using too much lemon juice with marble, since it can etch or damage the stone if left on too long. Hydrogen peroxide can be a safe alternative.
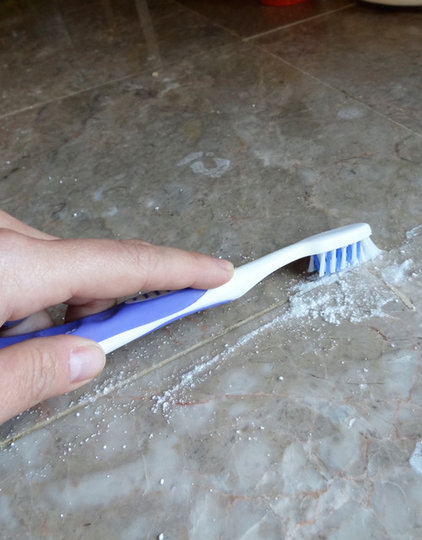
This coffee stain, on the other hand, took a bit more elbow grease, a longer soaking time and a few repeated attempts before it was sparkling clean again.
|
Still having trouble getting that grout clean? For those impossible-to-remove stains, you might want to consider:
Tip: An electric multitool, like the Dremel Mult-Max, helps to make quick and safe work of removing the old grout.
www.teambluesky.ca
|
Tuesday, June 18
8 Little Remodeling Touches That Make a Big Difference
by Samantha Schoech
When we did our remodel, our contractor suggested a thousand things I had never really thought about. They weren't necessarily design considerations; they were more quality-of-life considerations — just little things you didn't know you were missing until you had them.
Here are eight little touches I didn't know I couldn't live without until I lived with them. What are yours?
Here are eight little touches I didn't know I couldn't live without until I lived with them. What are yours?
1. A built-in dish soap dispenser. Because I don't care how nice the bottle is; it's just one more thing cluttering up your countertop.
|

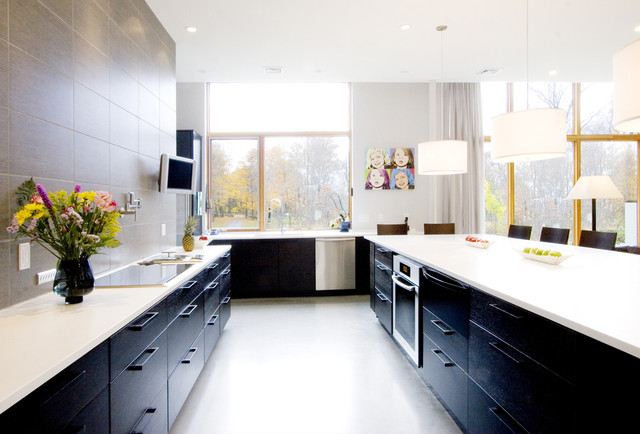
3. Large kitchen drawers. Looking down into a well-lit space is much better than looking deep into a dark cabinet. In this kitchen large drawers have completely replaced cabinets. Just make sure they are all soft close.
|
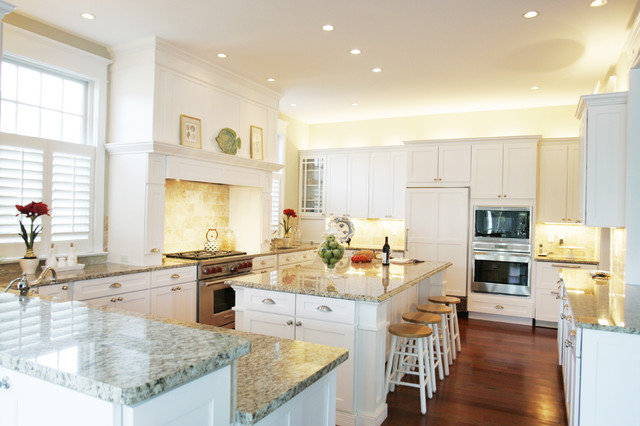
4. Undercabinet lighting. I know this seems like no-brainer, but before I had it I never knew how useful it could be for task lighting and mood lighting. But spring for LEDs. We opted for fluorescent to save money, and we regret it.
|
6. A garage keypad. You will never be locked out of your house again.
|
8. An automatic drip system. People told us, they did. But we didn't listen, and because of that we killed a lot of plants over 12 years. Last year we finally had an irrigation system put in. The yard is nicer, the plants are healthier and life is easier.
|

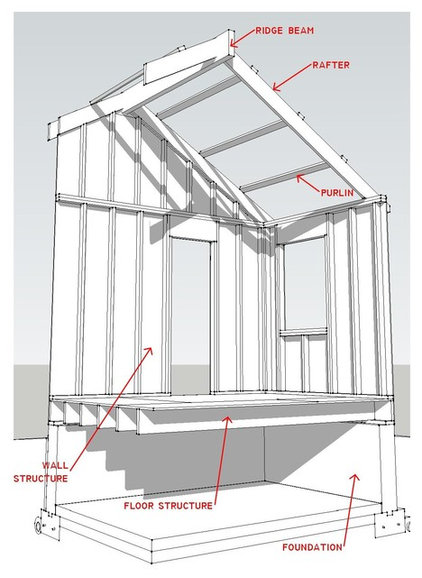
Know Your House: Components of a Roof
by Bud Dietrich
After you've installed your foundation, put down your floor structure and erected yourwalls, it's time to build your roof — one of the most important architectural elements. In fact, from the colonial home with its gable roof to a Prairie-style home with its hip roof, from a modern home with its low-sloping roof to an elegant mansard on an urban townhouse, we can't imagine a house style that doesn't have its associated roof configuration. Aligning the roof shape and configuration with the overall aesthetic you're after is essential to getting the look you want.
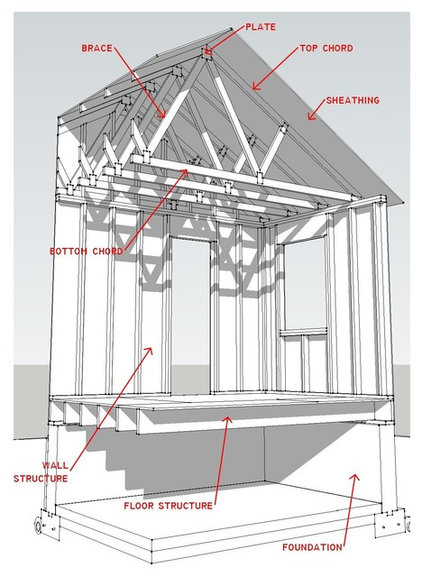
A roof also has an impact on the interior. Simply put, if all of the interior rooms have a flat ceiling of the same height, you can save time and money and have the roof built with manufactured trusses. If you're looking for some ceiling height variety and a vaulted ceiling in some rooms, you'll likely go with a stick-built roof that allows for this kind of flexibility. Or you can combine these two approaches to save time and money where possible while getting those special spaces you want.
Here are the different parts of a simple roof structure, how they come together and how they impact the interior spaces.


Monday, June 17
Canada’s cure for summer heat
Icewine is Red Hot
|
 As the heat waves start rolling this summer, cool off with a bottle of Canadian icewine, as cold and refreshing as the country’s below-zero temperatures, minus the frostbite. Icewine is made from frozen grapes (by law they can only be harvested when the temperature is under 18°F) that are hand-picked. The super-concentrated juice is then gently pressed out of them to create the sweet, high-acid, magically delicious wine that has become famous around the world. On average, icewines range from 12.5 to 20 percent residual sugar, but their super high acidity level keeps the wine refreshing instead of syrupy sweet. As the heat waves start rolling this summer, cool off with a bottle of Canadian icewine, as cold and refreshing as the country’s below-zero temperatures, minus the frostbite. Icewine is made from frozen grapes (by law they can only be harvested when the temperature is under 18°F) that are hand-picked. The super-concentrated juice is then gently pressed out of them to create the sweet, high-acid, magically delicious wine that has become famous around the world. On average, icewines range from 12.5 to 20 percent residual sugar, but their super high acidity level keeps the wine refreshing instead of syrupy sweet.Icewines can be white or red. The white versions are generally based on riesling or vidal blanc grapes; the red versions, on cabernet franc. And while you can drink them alone as desserts themselves, icewines also pair well with all kinds of food, from salty cheeses like aged cheddar to fruit-based desserts like strawberry trifle for white icewines and bittersweet chocolate truffle cake for red icewines. To see more delectable food pairings, visit top icewine producer Inniskillin’s website, where Estate Chef David Penny shares his pairing tips and recipes. Some of our favorite icewines: MISSION HILL WINERY Reserve Riesling Icewine (Okanagan Valley, Canada) $59 (375ml half bottle) INNISKILLIN Riesling Icewine (Okanagan Valley, Canada) $60 (375ml half bottle) PELLER ESTATES WINERY Cabernet Franc Icewine (Niagara Peninsula, Canada) $49 (200ml bottle) |
Friday, June 14
What Makes a Homes Foundation
Bud Dietrich
In many respects the foundation is the most important element of any building, be it a house or a high-rise. Simply put, the foundation is what everything rests on. So getting the foundation right will go a long way toward having a sound and stable building for many years.
From pilings to piers to spread footings and more, foundations can be built in many ways. The most common, though, is the simple foundation wall made of poured concrete or concrete block, and a poured concrete footing system. The vast majority of homes in North America are built using this approach, as it's relatively inexpensive and there are scores upon scores of tradespeople able to quickly and efficiently build it. Therefore, the focus of this piece is on the typical wall and footing foundation system.
And remember that you should consult a local architect or builder to review any planned foundation and how local building codes will impact the system design and construction.
The three structural parts of this kind of foundation:
A very important design consideration is placing the bottom of the footing below the frost line. This line exists at some distance below the surface and is where the ground, or any moisture in the ground, doesn't freeze. Placing the footing below the frost line is essential to prevent any heaving or other movement caused by the freeze-thaw cycle. Note that the depth of the frost line varies by location. The frost line is closer to the ground surface in warmer climates and much deeper in colder climates. But it's essential to know where your frost line is when designing your home's foundation. |

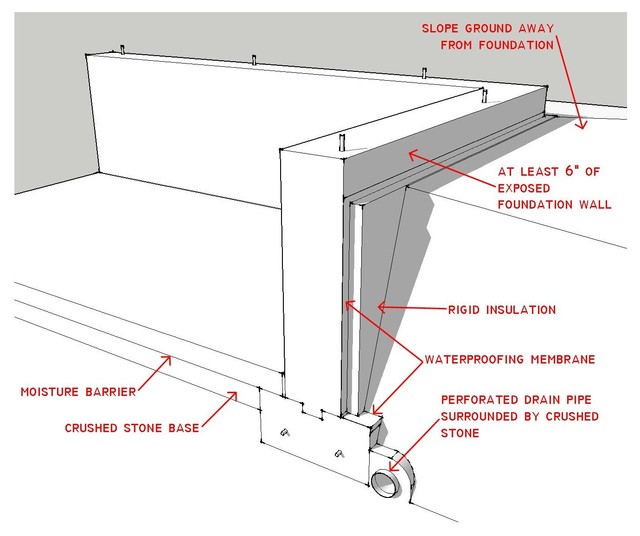
Keeping water out. A foundation system is in many ways like a big bathtub. But rather than keeping water in, we want to keep water out. Several components built into a foundation do just that.
First, the exterior, ground-side face of foundation walls will have a waterproofing material installed on it. This material should be strong enough to prevent punctures or tears and flexible enough to allow for any movement the foundation will experience. This moisture barrier should form a skin not only over the wall but at the top of the footing as well. Next in the line of defense against water is a perimeter drain near the bottom of the footing. This drain is a perforated pipe surrounded by crushed stone to keep dirt and debris from blocking the perforations. Groundwater will find its way to this drain and be channeled away from the footing. Making sure that these drains are clear is a critical step in making sure water doesn't get into the basement or crawl space. Other parts of the waterproofing system:
www.teambluesky.ca
|
Thursday, June 13
18 Ways to Allergy Proof your Home
Laura Gaskill
If you or someone else in your house suffers from allergies, you'll want to get the house as allergen free as possible. Whether you are allergic to dust, pets, mold, pollen or all of the above, it can be hard to know where to begin. These 18 ways to combat allergens and create a cleaner, healthier home will get you started.
1. Stick to a regular cleaning schedule. Keeping dust and pet dander at bay is a continual process, and it's especially important to stay on top of cleaning when allergies are a concern. Be sure to wipe surfaces with a damp rag rather than dry dusting, which often just brushes dust back into the air.
Ideally, members of the household without allergies would take on the dustiest jobs, but if you have bad allergies and must clean, wear a dust mask — or hire a cleaning service if you can. |
3. Upgrade your vacuum cleaner. Get one with a HEPA filter to trap allergens — these filters work wonders. Also be sure to choose a vacuum cleaner with a bag that can be changed easily (that is, without spewing dust everywhere).
|
7. Store all food in airtight containers. Don't tempt bugs and mice — every time you open a package, put the contents inside an airtight container in the cupboard or fridge.
8. Green your cleanup. Harsh chemical cleaners may irritate those with allergies. Luckily, it's quite easy to find safe and effective natural cleaners, so you can cut back on the synthetic stuff. |

11. Streamline kids' spaces. Children's rooms accumulate stuff like nowhere else in the house. But if allergies are a problem, having lots of toys — especially soft toys — everywhere will only make things worse. Try rotating out toys to keep things fresh (and neat), and store extras in an out-of-the-way closet. Washing stuffed animals when possible can also help keep dust at a minimum.
|
14. Clean and ventilate the bathroom regularly. Frequent cleaning and plenty of fresh air should keep mildew and mold at bay. But if you do see mold, be sure to use a cleaner that says it kills mold — not all of them do.
15. Replace filters in fans and heating and cooling systems. This is key for keeping the air in your home clean. Each time you change the filter in your bathroom exhaust system or air conditioning or heating system, mark the next change date on the calendar. |

Subscribe to:
Posts (Atom)